
MediaWiki by itself has a decent search. I think the results, or at least how effective it is in the hands of people, depend on the curation of the wiki. Is there a standard page naming convention (that everyone knows)? Are pages well interlinked? Are pages categorized? Are queries used to promote discovery based on topic/filter?
I highly recommend adding Elasticsearch by using Extension:CirrusSearch. If you have trouble installing and configuring it yourself, consider using Meza to do this hard work for you.
But what if you don’t know the name of the thing you want to learn about? You’ve seen the thing. You could maybe describe it, but I doubt any wiki pages include text to describe its shape. The page probably has at least one image, though. If only you could search by looking at images.
I’m going to share with you a simple technique to do just that — search for an item by looking through images. Here’s a preview:

Tool pages
Let’s work on a set of pages about tools. We’ll keep the content of these pages real simple to get the point across. Here’s the contents of the page “Hammer”.
[[Category:Tool]]
{{#set: Primary image=File:Hammer.jpg}}
The page is in the “Tool” category. The page has the value “File:Hammer.jpg” for the property “Primary image”. “File:Hammer.jpg” is an image of the hammer. If it’s not obvious, you need to upload these images for this to work.
Now imagine we’ve got several of these tool pages. Each one is in the category and each one has an image set.
The gallery page
We’ll create a page to display a gallery of these images. The page name will be “Image gallery of tools”. The contents are a simple query:
{{#ask: [[Category:Tool]] [[Primary image::+]]
| ?Primary image
| link = none
| format = template
| template = Primary image query results formatter
| limit = 2000
| intro = <ul class="gallery">
| outro = </ul>
}}
This is a Semantic MediaWiki query asking for all pages in Category:Tool that have a value for Property:Primary image.
The query will return for each result the page name and the value of “Primary image” and send the results without wiki link formatting to a template. The template is “Template:Primary image query results formatter”. We limit the results to 2000 (not required, but sometimes a good idea). If there are results from this query, then the results are displayed after the tag <ul class="gallery"> and before the tag </ul>.
The template
When you want to customize the format of query results, it can be very effective to use one or more templates. In this case, for every page that is identified by the conditions of our #ask: query, we will format those results using “Template:Primary image query results formatter”. Here are the contents of that template page:
<includeonly><li class="gallerybox">
<table>
<tr>
<td style="text-align:center;">[[{{{2|}}}|frameless|border|150x150px|link={{{1|}}}]]</td></tr><tr><td style="text-align:center">[[{{{1|}}}]]</td>
</tr>
</table>
</li></includeonly>
The <includeonly> tags are a standard template syntax, helping us be clear about which part of the page contents are used.
First, let’s focus on the main elements. We open a list item with the <li> tag. We expect a list of multiple items from the query and this is how we’ll organize them.
For each item in the list, we’ll use a table to format the information we display. There are two rows (indicated by the <tr> tags). For each of those table row tags we’ll center-align the contents.
The first row is for the image. Note that this syntax to display an image and specify a different place we want to send the user is documented on mediawiki.org. I’ll do my best to walk you through it, but that linked page can help provide more details.
Let’s look at the wikitext. The outermost part are the [[ ]] brackets indicating whatever is inside serves as a link to somewhere else in the wiki. {{{2|}}} indicates we want the second piece of data returned by the #ask: query to be placed here. Since the first item is always the pagename (unless you include “|mainlabel=none”), the second item is the value of the property “Primary image“. From our Hammer page example, that value would be “File:Hammer.jpg“. When the pagename of an image is inside those brackets, the MediaWiki parser will display the image and link to the image.
We include some options in this syntax. “frameless” and “border” indicate how the image should be displayed. “150x150px” indicate how large the image should be.
Finally, we have “link={{{1|}}}“. This is where we specify where the user is taken if they click the image. Instead of sending them to the page about the image, we want to send them to the page name of the item in the query results. In this example, it’s the Hammer page. Remember, we asked for pages in Category:Tool that have a value for “Primary image”. So the Hammer page is one of them.
In the second table row, we simply use the same wikitext brackets to link to the Hammer page. This text link serves as a caption for the image.
Here is what this image gallery will look like after the pages described above are saved.
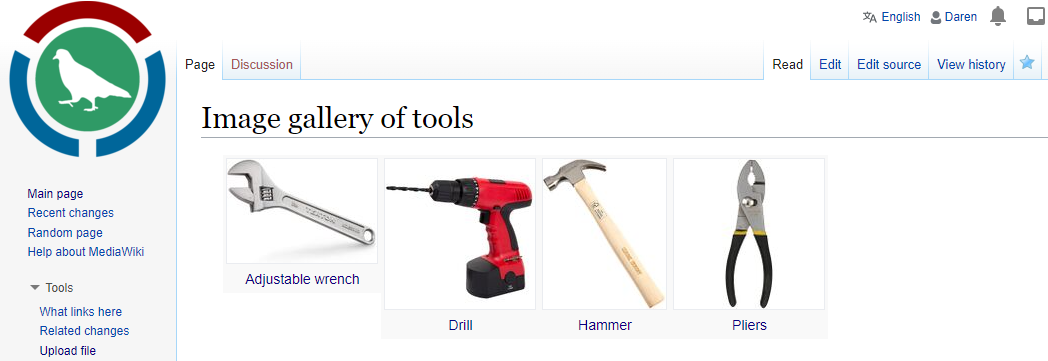
This is looking pretty good, but you might notice how the Adjustable wrench image is shorter than the others. We can tidy that up with some styling.
The template, but with style
Here’s a revision of “Template:Primary image query results formatter” with some additional style details.
<includeonly><li class="gallerybox"><div class="thumb">
<table>
<tr>
<td style="text-align:center;">[[{{{2|}}}|frameless|border|150x150px|link={{{1|}}}]]</td></tr><tr><td style="text-align:center">[[{{{1|}}}]]</td>
</tr>
</table>
</div>
</li></includeonly>
Notice I’ve added <div> tags around the table. This will apply the CSS from class “thumb” to everything inside the div.
In the page “MediaWiki:Common.css” you’ll add the following:
.thumb {
  margin: .5em 1.4em 1.3em 1.4em;
}
.thumb table {
  border: solid #ccc 1px;
  padding: 1px !important;
  background-color: #f9f9f9;
  font-size: 11px;
  line-height: 150%;
  text-align: center;
  overflow: hidden;
  width: 166px;
  height: 200px;
}
Note: I’m terribly lazy when it comes to learning CSS. I’m sure there are ways to clean this up and I’d love to hear feedback in the comments. But just go with me for the sake of this example.
Without going into each item, we’re basically standardizing each image block to be the same size, adjusting font size, and adding a border. Obviously you have lots of options here to customize your implementation.
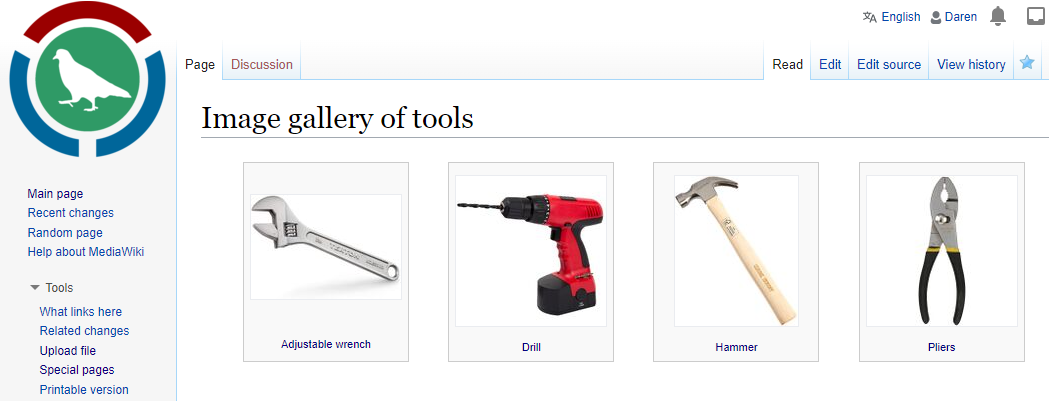
With this all in place, here’s what you’ll get:
Maybe this seems like an unnecessary page since you might expect everyone to know what these tools are called. But when you’re onboarding new team members this technique can be very effective in helping them find information about the thing they saw but can’t remember its name.
I hope this tutorial helps and I hope you find the concept useful. Please share and subscribe if you’re interested in more.